
Content-Aware Fill in Photoshop is a game-changer when it comes to removing unwanted objects from your photos. Whether you’re eliminating tourists from a landscape or cleaning up blemishes in a portrait, this tool intelligently replaces the removed area by analyzing the surrounding pixels.
By the end of this guide, you’ll be able to seamlessly erase distractions from your images with professional results. We’ll walk through each step, provide troubleshooting help, and include pro tips to speed up your workflow.
Step-by-Step Guide to Using Content-Aware Fill
- Open Your Image in Photoshop: Launch Photoshop and open the image you want to edit by going to File > Open.
- Select the Object You Want to Remove: Use any selection tool (like the Lasso Tool, Object Selection Tool, or Pen Tool) to highlight the area or object you want to remove.
- Open the Content-Aware Fill Workspace: With the object selected, go to Edit > Content-Aware Fill. This opens a new workspace with a live preview.

- Refine the Sampling Area: Photoshop automatically creates a green overlay indicating the sampling area. Use the Sampling Brush Tool to add or subtract from this area to improve fill accuracy.
- Preview the Fill Result: On the right panel, you’ll see a live Preview of how the fill will look. Make adjustments as needed to the sampling area or fill settings.
- Adjust Fill Settings: Tweak the Color Adaptation, Rotation Adaptation, Scale, and Mirror settings for better blending and realism.
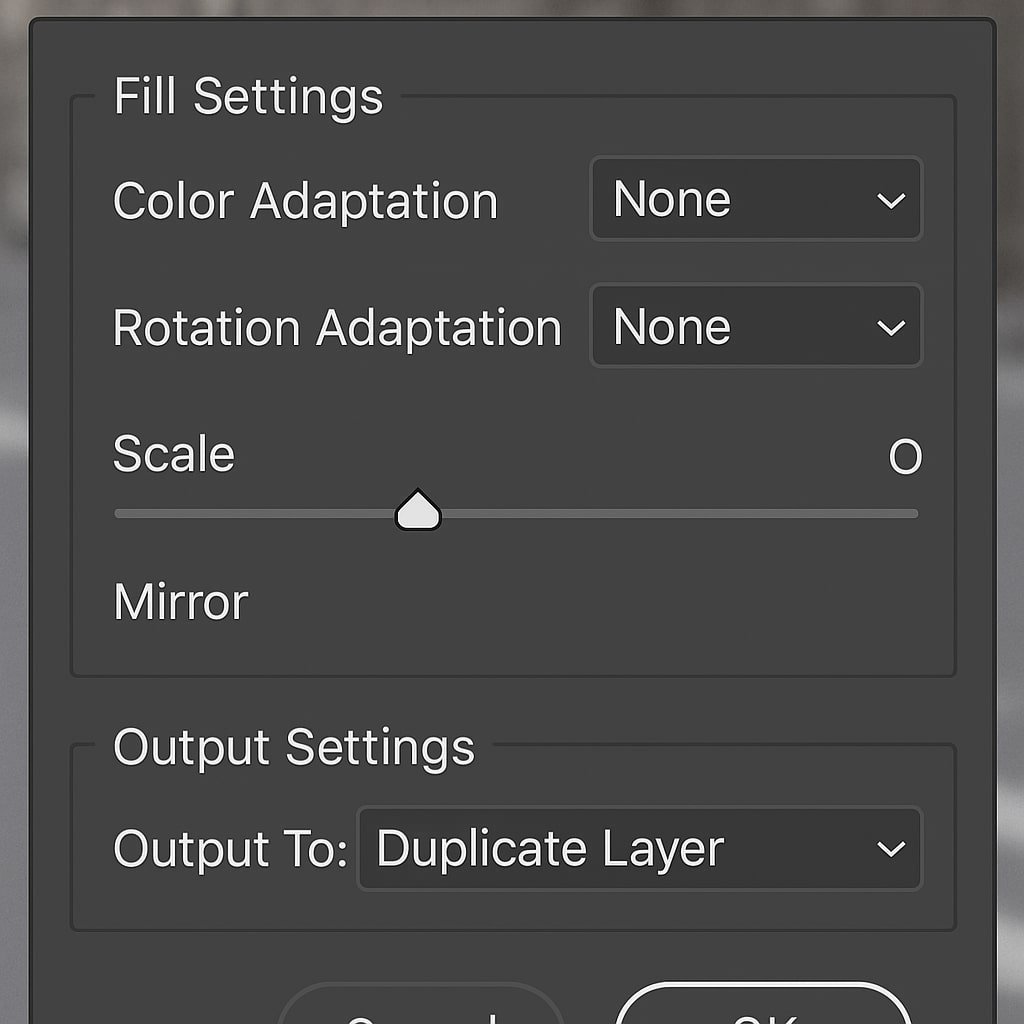
- Choose Output Settings: Under Output To, select whether you want the fill to be applied to Current Layer, New Layer, or Duplicate Layer. Choosing a new layer gives more flexibility.
- Click OK to Apply the Fill: Once satisfied with the preview, click OK to apply the fill to your image.
- Deselect the Selection: Press Ctrl+D (Windows) or Cmd+D (Mac) to remove the active selection.
- Fine-Tune with Clone Stamp or Healing Brush (Optional): Use the Clone Stamp Tool or Spot Healing Brush for small touch-ups to make the fill look perfect.
Pro Tips & Workflow Improvements
- Use a New Layer for Output: This allows you to keep the original image untouched and gives more control.
- Zoom In to inspect edges closely; sometimes artifacts are only visible up close.
- Save Before You Start: Content-Aware Fill can be memory-intensive. Save your work before entering the workspace.
- Use Feathered Selections: Slight feathering on your selection can help blend the fill more naturally.
- Quick Shortcut: After making a selection, press Shift+F5 to access Fill, then choose Content-Aware from the dropdown.
Advanced Use Case: Batch Object Removal with Actions
If you have multiple images needing the same object removed (like a logo or watermark), create a Photoshop Actionusing Content-Aware Fill steps. Then batch process the folder via File > Automate > Batch.
Troubleshooting & Common Mistakes
- Weird Fill Results? Try refining your selection and sampling area.
- Preview Lagging? Lower the resolution or zoom out for smoother performance.
- Edge Halos? Feather your selection or use the Healing Brush to clean up.
- Fill Doesn’t Match Background? Adjust Color Adaptation settings.
- Tool Grayed Out? Ensure you’re working on a pixel layer and not a smart object or adjustment layer.
Conclusion
Photoshop’s Content-Aware Fill is a must-have for efficient photo retouching. With a good selection and smart sampling, you can erase distractions like they were never there. Try combining this tool with cloning and healing techniques for professional-grade results.