Motion tracking in Adobe After Effects lets you follow the movement of objects in your footage and attach graphics, text, or effects to them. Whether you’re adding a label to a moving car or syncing a lens flare to a light source, motion tracking is your go-to tool.
In this guide, you’ll learn how to perform both basic and advanced motion tracking in After Effects. You’ll see how to track position, rotation, and scale — and even how to stabilize shaky footage or apply tracking data to text and 3D layers.
By the end, you’ll be ready to tackle real-world motion tracking projects with precision and confidence.
Step-by-Step Guide: Track Motion in After Effects
- Import Your Footage
- Open After Effects and create a new composition by dragging your video into the timeline or clicking Composition > New Composition.
- Ensure the footage has visible contrast (for easier tracking).
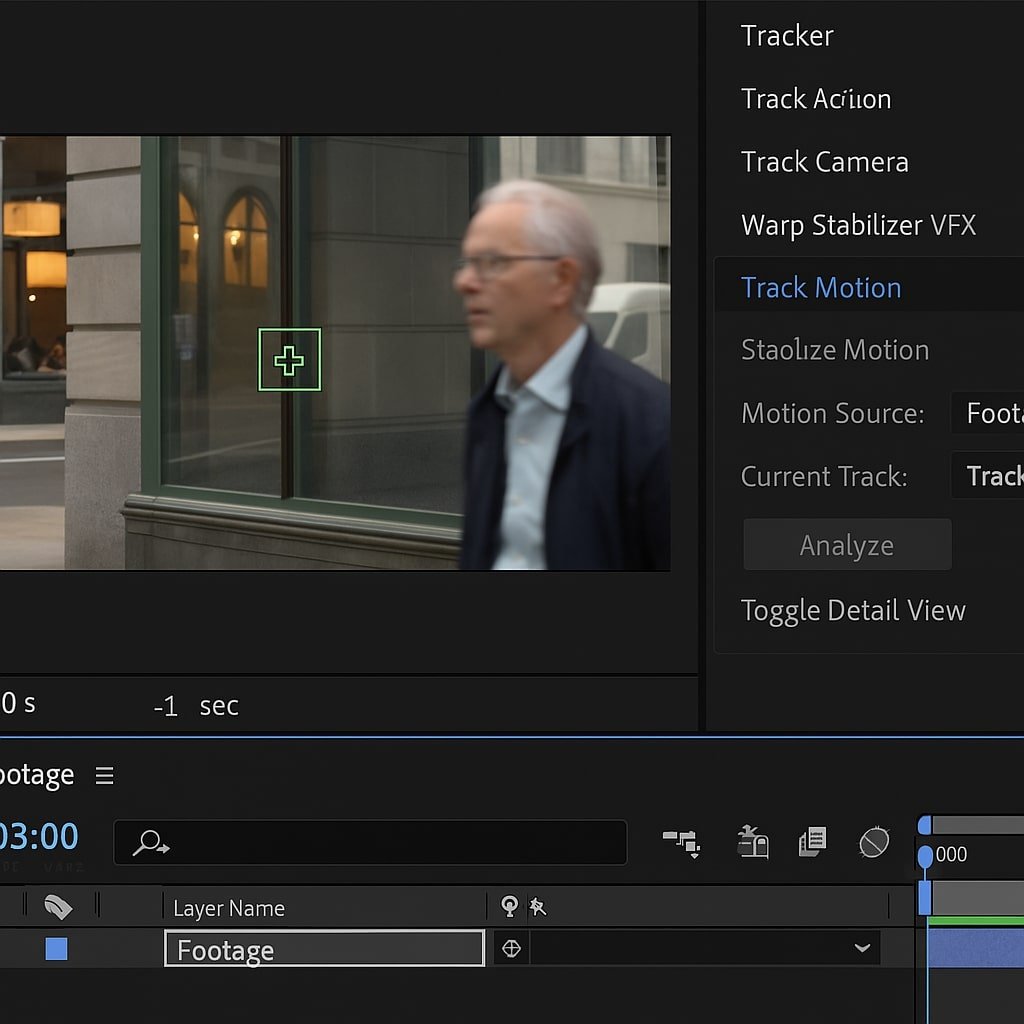
- Open the Tracker Panel
- Go to Window > Tracker to make the Tracker panel visible.
- Select your footage layer in the timeline.
- Choose “Track Motion”
- In the Tracker panel, click Track Motion.
- This adds a Track Point overlay with a small square (feature region) and an outer square (search region).
- Set the Tracking Type
- By default, it tracks position.
- To also track rotation or scale, check those options in the Tracker panel.
- A second track point will appear if you enable rotation or scale.
- Position the Track Points
- Drag the inner box over a high-contrast feature (e.g., corner, object detail).
- The outer box defines the area After Effects will search for the feature in subsequent frames.
- Start Tracking
- Click the Play/Analyze Forward button in the Tracker panel.
- Watch it track frame-by-frame; if it slips, hit Stop, undo, and adjust the box or frame-by-frame analyze.
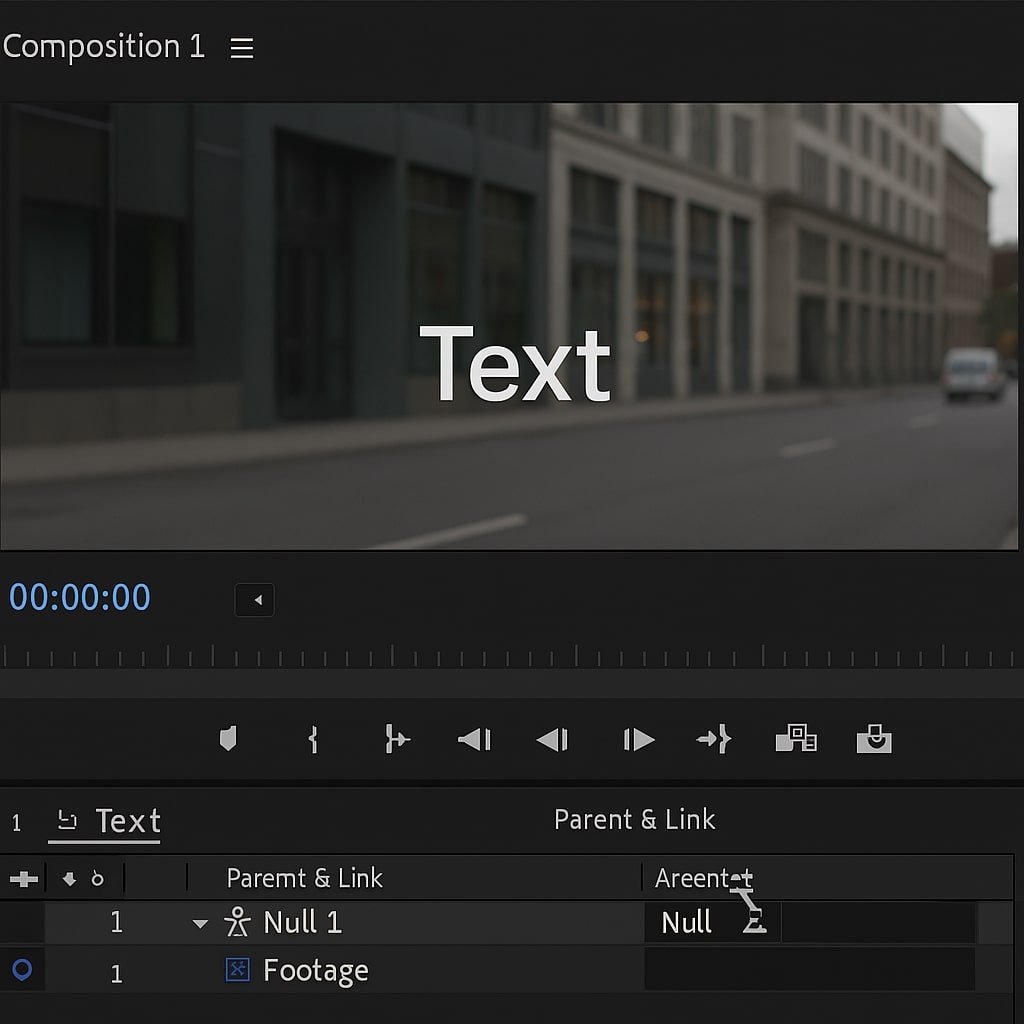
- Attach to a Null Object
- Go to Layer > New > Null Object.
- In the Tracker panel, click Edit Target and select the null.
- Hit Apply and choose to apply to X and Y.
- Parent Your Graphics or Text
- Create your text or image layer (e.g., a label).
- Use the Pick Whip to parent it to the null object.
- It will now follow the motion.
- Fine-Tune the Position
- Adjust the position or anchor point of the attached layer to sit exactly where you want it on the moving object.
- Preview and Refine
- Use RAM Preview or spacebar to watch your result.
- Adjust keyframes or re-track if needed.
Pro Tips & Workflow Improvements
- Use Color Correction for Better Tracking: Temporarily boost contrast or saturation with an Adjustment Layerto improve tracking, then delete it after.
- Increase Accuracy with Subpixel Tracking: In the Tracker Options, enable Subpixel Positioning for smoother results.
- Use Mocha AE for Complex Tracks: For planar surfaces or advanced roto, switch to Animation > Track in Mocha AE.
- Label Track Points Clearly: Rename your Null and Track Points in the timeline to stay organized.
- Use Expressions for Effects: Link properties like opacity or scale to tracking data using expressions for more dynamic effects.
Advanced Use Case: 3D Camera Tracking
If your footage has camera movement (not just object movement), use 3D Camera Tracker:
- Select the footage and go to Animation > Track Camera.
- After it analyzes, click on a target, right-click, and choose Create Text and Camera.
- Attach 3D elements that align with the real-world perspective!
Troubleshooting & Common Mistakes
- Tracking Point Jumps or Slips
→ Solution: Reposition the feature region on a more distinct feature and track again. - “Motion Source Must Be a Footage Layer” Error
→ Solution: Pre-compose the layer if it has effects or masks applied. - Tracking Data Isn’t Applying to Null
→ Solution: Double-check that you’ve selected the correct target before clicking Apply. - Graphics Don’t Match Motion Smoothly
→ Solution: Try smoothing the tracking data by adding an Easy Ease to the null’s keyframes or applying a Smoother from the Window menu. - Tracker Panel Not Showing
→ Solution: Go to Window > Tracker to make it visible again.
Conclusion
Motion tracking in After Effects opens up powerful ways to blend graphics and footage seamlessly. Once you’ve mastered tracking and parenting, you can take your visual storytelling to the next level — from floating text to sci-fi HUDs.