Tired of clicking through menus or searching for your favorite app each time you need it? Windows lets you create custom keyboard shortcuts so you can launch any application with a simple key combo.
In this guide, you’ll learn how to create your own keyboard shortcuts using built-in Windows tools — no third-party software required. By the end, you’ll be able to open your most-used programs with just a few keystrokes.
This method is especially helpful for boosting productivity, streamlining workflows, and cutting down on repetitive tasks.
Step-by-Step Guide
1. Find or Create a Shortcut for thre App
- Navigate to the app’s location (e.g., in the Start Menu, Program Files, or on the Desktop).
- If it doesn’t already have a shortcut, right-click the app > select Show more options > Send to > Desktop (create shortcut).
2. Right-Click the Shortcut
- On your Desktop (or wherever the shortcut is), right-click the icon and select Properties.
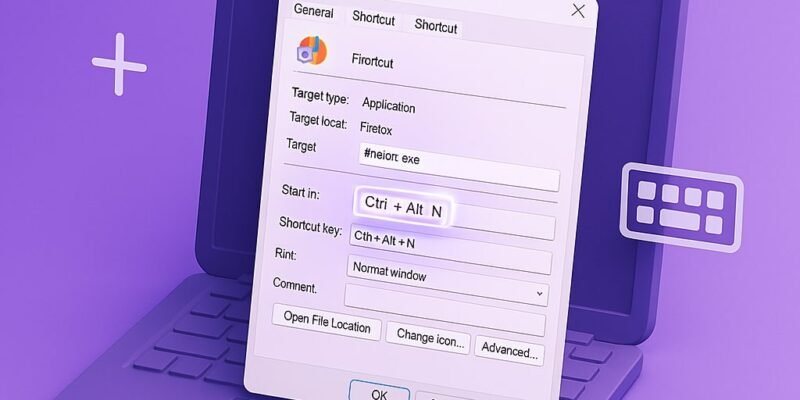
3. Go to the Shortcut Tab
- In the Properties window, make sure you’re on the Shortcut tab. This is where you’ll find the keyboard shortcut settings.
4. Click in the “Shortcut key” Field
- Click inside the Shortcut key box. It will say None by default.
5. Press the Key Combination You Want
- Press the key combo you want to use (e.g.,
Ctrl + Alt + N). - Windows automatically adds
Ctrl + Altto your chosen key, so pressing justNresults inCtrl + Alt + N.
6. Click Apply, Then OK
- After setting your shortcut, click Apply, then OK to save it.
7. Test Your New Shortcut
- Press the key combo you assigned. Your app should launch instantly.
Pro Tips & Workflow Improvements
- 💡 Use Win + # for Taskbar Shortcuts: Pin apps to your Taskbar, then use
Win + 1throughWin + 0to launch them. - 🧠 Name Shortcuts Clearly: If you make many custom shortcuts, name them meaningfully to avoid confusion.
- 🧰 Use “AutoHotKey” for Advanced Shortcuts: For more complex actions (like typing text or launching multiple apps), AutoHotKey is a free scripting tool worth learning.
- 🖥️ Combine with Startup Folder: Place your shortcut in the Startup folder to auto-run programs at boot andstill use your hotkey later.
- 🔁 Use F-keys with Caution: If your keyboard uses Fn keys (F1–F12), ensure they’re not reserved for system functions (like volume or brightness).
Advanced Use Case: Automate with AutoHotKey
Want to create shortcuts that do more than just launch an app? Here’s a simple AutoHotKey script example:
^!n::Run "notepad.exe"- This sets
Ctrl + Alt + Nto open Notepad. - Save this as a
.ahkfile and run it using the AutoHotKey tool. - Great for power users who want full control over keybindings.
Troubleshooting & Common Mistakes
- ❌ Shortcut Not Working?
- Make sure the shortcut is on the Desktop or a location your user account can access.
- 🛑 Some Combos Are Reserved:
- Windows may block certain combinations (e.g.,
Ctrl + Alt + Del). Try a different key combo.
- Windows may block certain combinations (e.g.,
- 🔄 Shortcut Key Gets Reset:
- Windows updates or app reinstalls may reset properties. Reapply your shortcut if needed.
- 🧱 Shortcuts Only Work on Desktop Shortcuts:
- You can’t set a hotkey for a pinned Start Menu or Taskbar app directly — you need to use a Desktop shortcut.
- 🧩 App Requires Admin Access?
- Some apps won’t launch unless the shortcut is set to “Run as administrator.” Enable that in the Properties > Compatibility tab.
Conclusion
Creating a custom keyboard shortcut in Windows is a fast, easy way to boost your productivity. With just a few clicks, you can map your favorite apps to instant-launch key combos.
Practice with a few common tools (like Notepad, Calculator, or Chrome), and once you’re comfortable, explore advanced options with AutoHotKey.
Next up, try this: Create a system-wide hotkey to paste text snippets or launch folders using AutoHotKey.